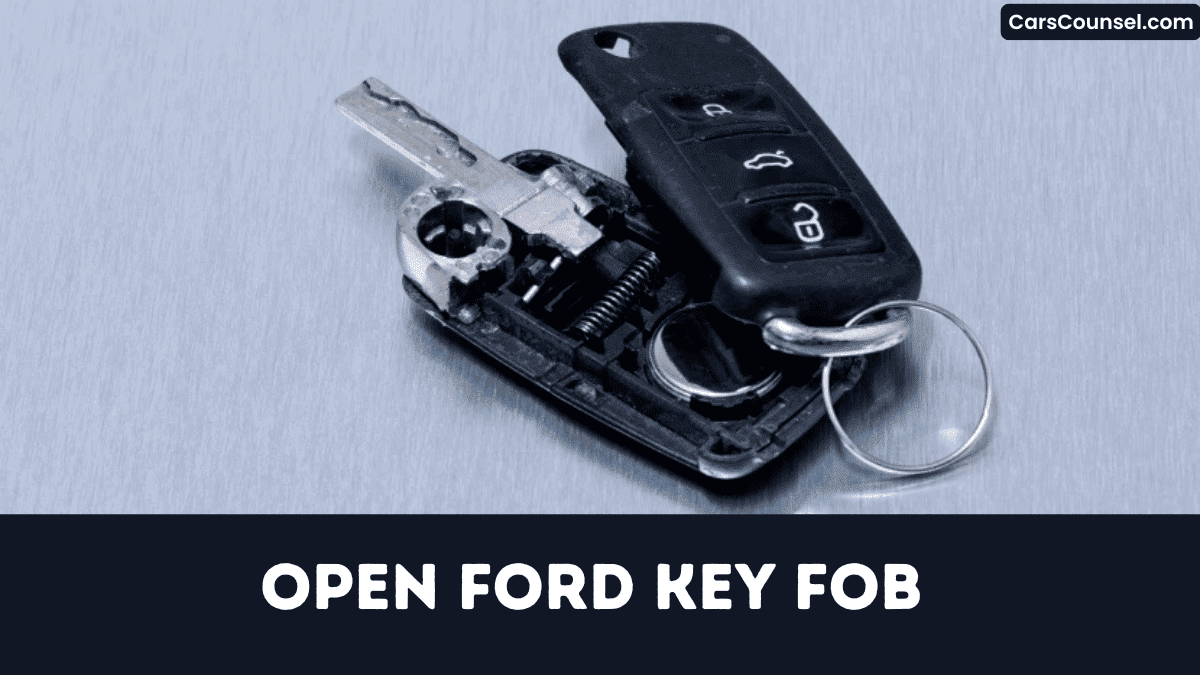
You’ve got a dead Ford key fob and need a new battery. First, identify the model, then locate the narrow release slot and lift the blade with a 2‑mm flat‑head screwdriver.
A small seam opposite the slot lets you pry the halves apart without cracking the case.
Follow the precise sequence, and you’ll prevent costly damage while swapping the cell. The next steps reveal the exact method to reassemble without error.
Quick Navigation
Key Takeaways
- Locate the narrow release slot near the key blade, insert a flat‑head screwdriver or coin, and gently pry upward to free the blade.
- Find the 1‑2 mm seam opposite the slot, insert a plastic spudger or coin, and apply even pressure while rotating to separate the halves.
- If the case sticks, warm the seam with a hair dryer for ~10 seconds or apply a drop of silicone spray before prying.
- After opening, use non‑conductive tweezers to lift the CR2032 battery, noting the “+” side orientation for later replacement.
- Replace the battery with correct polarity, re‑align the halves, press until a click seals the gasket, and verify the fob functions.
Identify Your Ford Key Fob Model Before Opening
Need to know which Ford key fob you have before you pry it open? Check the four‑digit model codes stamped on the back; U504 identifies 2016‑2020 Fusion/Edge units.
Check the four‑digit code on the back; U504 signals a 2016‑2020 Fusion/Edge key fob.
Compare the blade shape: a flat blade‑only design signals 2008‑2012 fobs, while an integrated blade‑and‑remote indicates 2013‑2022 versions.
Examine the button layout: a single lock/open button belongs to 2010‑2014 Explorer fobs, whereas separate lock, open, and panic buttons mark 2015‑2023 models.
A left‑side trunk button isolates 2017‑2022 Mustang and F‑150 fobs.
Finally, read the printed battery type—CR2032 for most 2009‑2022, CR2025 for older units—to confirm generation and verify compatibility before proceeding.
Gather Tools for Opening a Ford Key Fob
How can you safely open a Ford key fob?
Begin with careful tool selection.
Use a 2‑3 mm flat‑head screwdriver or a dime to pry the seam without cracking the housing.
A small plastic pry tool works for recessed designs.
Keep safety gear on: nitrile gloves or a microfiber cloth shield the circuit board from fingerprints and static.
Thin, non‑conductive tweezers lift the CR2032 battery while keeping fingers away from contacts.
Optionally, a battery tester or multimeter confirms the old cell’s ~3.0 V before removal.
Gather these items before you start to guarantee a clean, risk‑free disassembly and preserve functionality completely.
Locate the Release Slot and Extract the Key Blade
First, you locate the narrow rectangular release slot on the side of the fob near the blade housing.
Then you observe the spring‑loaded blade retainer and insert a flat‑head screwdriver or coin to apply a gentle upward push.
Finally, you extract the key blade straight out, keeping it aligned to avoid bending.
Locate Release Slot
When you hold the fob with the logo facing down, the release slot shows up as a narrow rectangular opening on the side near the key blade’s resting position, usually about 2 mm wide and 5 mm deep.
Turn the fob so the logo’s facing you and the blade side rests down; then scan the side for visual cues such as an embossed arrow or a “KEY RELEASE” label.
Feel for texture differences—smooth plastic gives way to a slightly ridged area marking the slot.
If a blade‑extraction button exists, the slot sits directly above it, allowing a press instead of tools.
Observe Blade Retainer
Because the blade retainer is a thin metal latch on the underside of the fob’s side seam, you’ll locate a 2‑3 mm wide release slot running parallel to it by turning the fob over and feeling for the shallow groove.
Insert a flat‑head screwdriver or coin, apply steady upward pressure, and listen for the click that confirms disengagement.
- Locate shallow groove.
- Insert flat‑head tool.
- Press upward to release.
- Hear click.
- Verify no tension.
Proceed only after confirming release.
The retainer’s ergonomics guarantee smooth operation, and its material durability prevents deformation during removal, keeping the key blade intact for battery replacement.
Gently Extract Key Blade
Locating the thin rectangular release slot on the fob’s side—about 2 mm wide near the bottom edge—means you’ll insert a small flat‑head screwdriver or a coin and apply gentle upward pressure.
Feel the tactile feedback as the retaining clip releases; this confirms correct blade ergonomics alignment.
While maintaining pressure, slide the key blade upward 1–2 mm until it clears the internal latch. Don’t twist or yank—the metal may bend and contacts could scar.
Once the blade emerges, place it on a clean surface before you replace the battery or perform further maintenance. Secure the fob housing before closing it tightly.
Pry the Case Open Without Damaging the Seams
First, you locate the narrow seam release slot beside the key blade and align your tool with it.
Then, you’ll insert a 2.5 mm flat‑head screwdriver or a soft‑plastic pry tool, keeping it parallel and tilted no more than 10° to the surface.
Finally, you apply gentle, even pressure around the perimeter, pausing and rotating the fob whenever resistance appears to avoid damaging the seams.
Locate Seam Release Slot
Where’s the seam release slot?
You’ll find it as a 1‑2 mm groove along the outer edge opposite the key‑blade release button, with slot visibility improved by a rectangular indentation on the backside of newer fobs (≈3 mm × 1 mm).
- Locate the groove by feeling for the 1‑2 mm indentation on the fob’s perimeter.
- Verify slot visibility on the backside; the rectangle measures roughly 3 mm by 1 mm.
- Align a flat‑head screwdriver or coin tip within the groove without forcing.
- Apply steady pressure of 0.5–1 kg, rotating no more than 15°.
- Slide the tool along the seam for 5–7 seconds to release all latch clips evenly.
Use Proper Tool
With a thin, non‑metallic pry tool—such as a plastic spudger or a 2 mm coin—you’ll insert it into the seam release slot and apply no more than 0.9 kg of pressure, working around the fob in 5‑mm increments to disengage the latch clips without cracking the ABS housing.
Choose a tool whose grip fits your fingertip, because good tool ergonomics reduce slip and let you maintain the 0.9 kg limit; the plastic’s material durability resists deformation, so it slides into the 0.4–0.6 mm gap without gouging the ABS.
Progress clockwise, listening for the click, then wiggle gently to free each latch securely again.
Apply Gentle Even Pressure
Although the fob’s ABS housing is fragile, you insert a thin flat‑head screwdriver or a coin into the seam slot and apply about 2–3 lb of steady pressure.
Keep the tool parallel, then glide it slowly around the perimeter, maintaining steady force for even distribution.
If resistance appears, pause, re‑apply gentle pressure for a few seconds, allowing latch springs to release.
Once you’ve heard a soft click, separate the halves without jerking, preserving the gasket seal for future resealing.
- Insert tool parallel.
- Apply 2–3 lb steady force.
- Glide slowly around perimeter.
- Pause on resistance, re‑apply pressure.
- Allow soft click, separate halves.
What to Do If the Case Sticks : Troubleshooting Tips?
If the fob case sticks, start by applying gentle pressure with a flat‑head screwdriver or a coin at the seam while rotating slightly to overcome static friction without cracking the plastic.
Apply gentle pressure with a flat‑head screwdriver or coin, rotating slightly to overcome static friction.
Apply heat application with a hair dryer for ten seconds; expansion loosens joint.
Insert a thin plastic spudger along the seam and pry gently.
If friction persists, perform lubricant usage by adding a drop of silicone spray to latch, wiping excess.
Remove debris with an isopropyl‑alcohol‑dampened swab.
Should the case stay stuck after three tries, tap it lightly on a folded towel to realign internal latches before retrying.
Remove the Old Battery From Your Ford Key Fob
Open the fob case and locate the flat, round CR2032 battery against the metal contact plate.
Insert a small flat‑head screwdriver under the battery edge and you’ll gently pry it upward, keeping the contacts straight.
Note the positive side faces up, slide the battery out, and dispose of it per local hazardous‑waste regulations.
Locate Battery Compartment
By feeling for the tiny slot on the fob’s side where the key blade releases, you’ll pry the two halves apart with a flat‑head screwdriver or a coin, taking care not to break the seam.
Inside, interior markings outline a shallow circular recess that houses the CR2032 cell; the “+” symbol faces upward when opened.
- Locate the side slot where the key blade exits.
- Observe the seam’s visual cues to split the case cleanly.
- Identify interior markings that outline the battery recess.
- Confirm the circular cavity matches a CR2032 coin cell.
- Note the “+” marking to verify polarity orientation.
Pry Out Old Battery
When you insert a thin flat‑head screwdriver into the seam beside the key‑blade slot, gently lever the two halves apart and don’t snap the plastic clips.
Once open, locate the CR2032 cell and use the screwdriver tip to lift the battery grip without bending metal contacts.
Note the “+” side up, then slide the battery straight out of its holder, avoiding stress on the circuitry.
Dispose of the spent cell per local hazardous‑waste rules.
Inspect the compartment, perform contact cleaning if residue appears, and guarantee the area is debris‑free before seating the new battery to guarantee reliability and longevity.
Check Which Way the Battery Goes (Polarity)
How do you make sure the CR2032 battery is installed correctly in your Ford key fob?
Inspect the compartment for polarity symbols and verify contact alignment before placing the cell.
Check the compartment for polarity markings and ensure contacts align correctly before inserting the battery.
The positive dome must face the metal pad, while the flat side rests on the plastic base.
- Don’t overlook a printed “+” or arrow inside the cavity.
- Make certain the raised dome contacts the top metal clip.
- Confirm the flat side touches the recessed negative terminal.
- Press gently until the battery snaps into place.
- Verify no gap exists between the cell and contacts.
A secure fit confirms correct polarity before resealing.
Insert the New Battery Correctly
Because the fob’s cavity marks the positive side with a “+”, you should align the CR2032’s dome upward before inserting it.
Press the battery firmly until it contacts the metal leads, creating a reliable link. Verify it sits flush, without tilt, to avoid intermittent signal loss.
Don’t touch the flat surfaces with bare fingers; oils impair conductivity, so wear gloves or a clean cloth.
Choose a reputable brand selection for consistent voltage and low self‑discharge.
Note the installation date and use the battery’s expiration tracking label for future swaps.
Proper insertion maximizes fob performance and significantly extends its lifespan.
Snap the Cover Back Securely
After the battery’s in place, align the two halves so the latch tabs interlock and press firmly until you’ll hear a single click, confirming the cover is fully seated.
Place battery, align halves, press until a click confirms the cover is fully seated.
- Apply even pressure across the seam.
- Check for gaps larger than 0.5 mm.
- Confirm silicone gasket fully compresses.
- Verify plastic clips aren’t cracked.
- Tug the fob; it should resist movement.
The audible click confirms proper latch engagement and complete gasket compression, securing water resistance.
If any movement is felt, reopen, realign tabs, and repeat pressure until the seal is tight and the fob feels solid. Don’t force the halves.
Test All Remote Functions After Reassembly
Now that the cover is sealed, verify the fob’s operation by testing every remote command.
Perform signal verification by pressing lock then release within five seconds and confirm at least ten‑meter range testing with a handheld receiver.
Hold the trunk‑release button for two seconds; the latch must engage within 0.8 seconds to prove circuit continuity.
Activate the panic alarm by holding the red button three seconds; the horn should sound four seconds and the lights flash.
If equipped with push‑button start, press start/stop inside the vehicle; the engine must crank within one second, confirming the proximity sensor works properly.
Resolve Common Opening Problems for Ford Key Fobs
If the case seam resists prying, use a thin coin instead of a screwdriver and gently twist to release the cover, which prevents stripping the plastic.
You should also check the key blade release, battery compartment, hidden latch, and seam debris, while considering plastic fatigue and environmental factors that can stiffen joints.
- Press side release button, then pull blade out.
- Slide flat‑head screwdriver under battery, lift gently.
- Wipe seam with dry cloth before re‑pressing.
- Insert coin in hidden latch gap, torque slightly.
- Check for cracks indicating plastic fatigue before forcing.
These steps prevent damage despite environmental factors, ensuring safety.
How to Open Key Fobs by Brand: Hidden Key Release, Battery Type & Case Separation
| Toyota Key Fob | Honda Key Fob | Hyundai Key Fob |
| Chevy Key Fob | Jeep Key Fob | |
| Subaru Key Fob | Kia Key Fob | Mercedes Key Fob |
| Audi Key Fob | Volvo Key Fob | VW Key Fob |
Frequently Asked Questions
How Do I Open the Ford Key Fob?
You’re opening the Ford key fob by inserting a flat‑head screwdriver into the side slot, prying the seam, removing the cover, then performing battery replacement; afterwards verify key programming before re‑assembling and testing functions thoroughly.
How to Take Apart a Ford F150 Key Fob?
Like a medieval scribe unveiling a secret, you’re taking apart a Ford F‑150 key fob by prying the seam, removing the CR2032 for battery replacement, then gently lift the PCB for circuit testing and inspect.
How to Take Apart a 2018 Ford Key Fob?
You’re taking apart a 2018 Ford key fob by prying the side slot with a flat‑head tool, separating the halves, removing the CR2032 for battery replacement, then performing circuit testing before reassembly, carefully checking contacts.
How Do I Open up a Key Fob?
95% of key‑fob failures stem from battery depletion, so you’ll open it by locating the side slot, using a plastic pry tool to separate the halves carefully, then perform the battery replacement and reassemble properly.
Conclusion
Now you’ve mastered opening your Ford key fob, so you can confidently replace the battery and keep your vehicle secure. Follow the steps, apply steady pressure, and avoid forcing the seams; the right tools and a little heat prevent damage. When you snap the cover back, confirm it clicks securely. Test each function—lock, open, trunk—before you finish. With these precise, practical practices, future fixes will be fast, frustration‑free, and fully functional for your daily drive.